

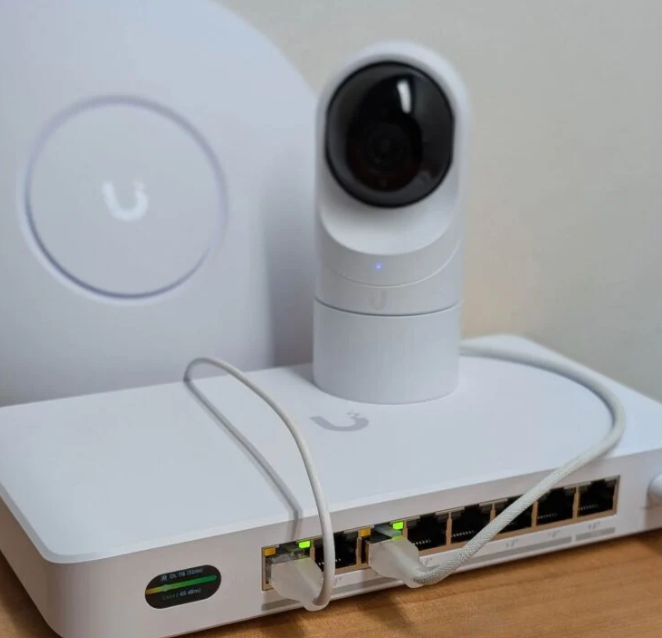
I have several locations in my home where running Ethernet cables would be tricky, and drilling holes in anything has been something I have tried to avoid. So, what can a guy do to enable wired connections in areas that do not have the capabilities? Enter the UniFi Device Bridge Switch.
While I have had limited free time with the device, I wanted to share some initial thoughts on the hardware.
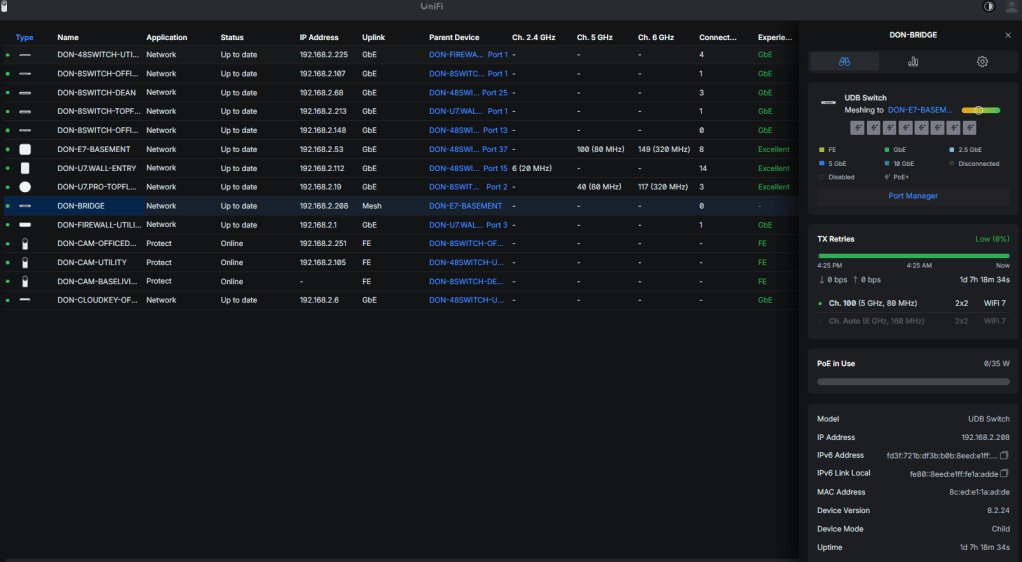
First, adopting the device bridge was difficult until I decided to just connect it to one of my wired switches to initiate the link, but once this was done, the device adopted quickly. Without the wired connection, when trying to adopt via Wi-Fi alone, it kept getting in a boot loop attempting to find the Wi-Fi.
Once adopted, I did manage to perform a single test on the device, hooking up my work laptop to it while the switch was using only Wi-Fi. Again, it was just one test, but the laptop had excellent coverage and significantly higher internet speeds than when using a direct Wi-Fi connection without the switch. The test device was pretty close to the mesh parent (E7 in utility room), so will need to see what the range is. If I remember right, I was getting around 4-500Mbps download speeds, and once connected to the device bridge, speeds went up to about 700-800; this is lower than wired connections, but since this device can be used wirelessly, the applications are limitless.
UniFi Device Bridge Switch Review
What it is
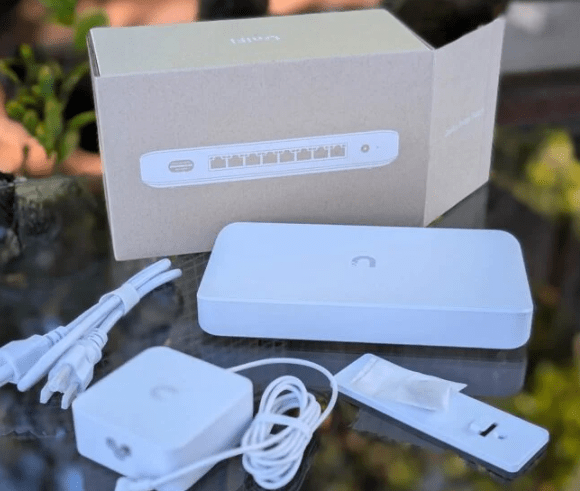
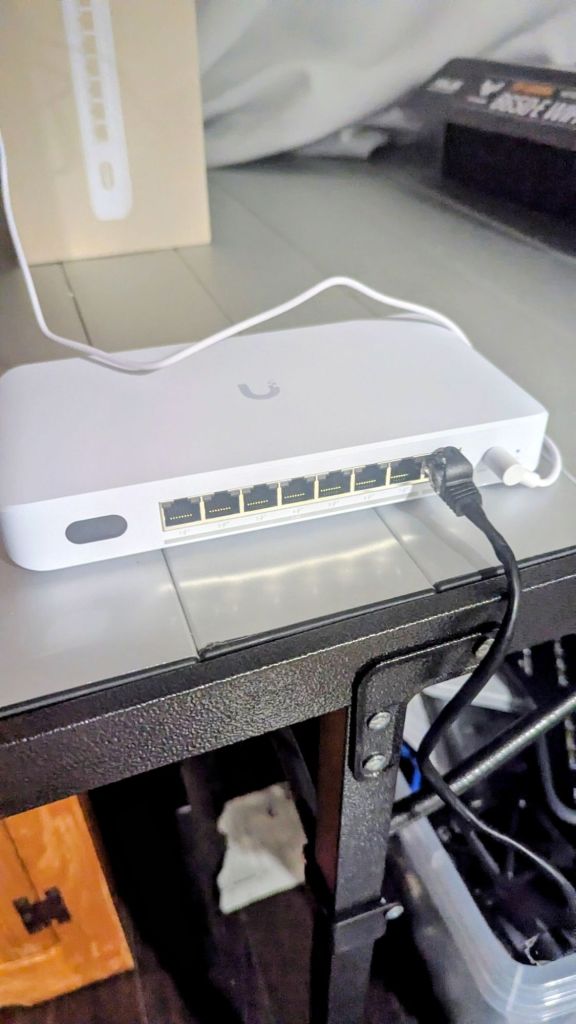
The UniFi Device Bridge Switch is essentially a small UniFi switch with a built-in wireless bridge. Instead of connecting upstream via copper or fiber, it uses a dedicated UniFi “device bridge” radio link to connect back to another UniFi device bridge / base station (depending on your model and setup). The result: you get a few Ethernet ports at a remote location as if you had run a cable, but the “uplink” is wireless.
Think of it as: “I need a switch over there, but I can’t (or don’t want to) trench, pull conduit, or deal with fiber.”
How it’s used
Most people use it to extend a wired network to places where cabling is expensive or impossible:
- Outbuildings (garage, workshop, barn, shed)
- Temporary deployments (events, construction trailers, pop-up retail)
- Outdoor areas (gates, pole cams, parking lots)
- Hard-to-wire interiors (historic buildings, rentals)
Typical deployment looks like this:
- You mount/install the bridge-side device at the remote location (the bridge switch).
- It links wirelessly back to a UniFi bridge/base on your main network.
- You plug wired devices (cameras, access points, phones, printers, small switches) into the bridge switch ports.
- Manage everything in UniFi like it’s just another uplinked switch.
How it compares
Versus “normal Wi-Fi” (client Wi-Fi)
A regular Wi-Fi connection (like connecting a smart TV or PC to Wi-Fi) is built around shared airtime, roaming, and client behavior. A bridge link is closer to a purpose-built point-to-point (or point-to-multipoint) connection.
Bridge advantages over normal Wi-Fi:
- Typically more stable than “client Wi-Fi” for fixed links
- Cleaner network design: remote devices stay wired, no juggling dozens of Wi-Fi clients
- Better for latency-sensitive stuff than weak Wi-Fi clients at the edge of coverage
- Managed as infrastructure rather than “just another client”
Bridge disadvantages:
- Still wireless: subject to interference, obstructions, and weather/installation quality
- Requires a paired UniFi bridge/base device for best results
- Not as flexible as Wi-Fi for mobile devices
Versus hardlined Ethernet / fiber
A cable is still the gold standard. If you can run fiber or copper safely and affordably, you almost always should.
Where hardline wins:
- Highest reliability
- Most consistent throughput and latency
- Immune to RF noise
- Better for high camera counts, heavy upstream traffic, and “set and forget” installs
Where the bridge switch wins:
- Much faster and cheaper than trenching, conduit, permits, or drilling
- Great solution for “I need connectivity this week, not next quarter”
- Works where running a cable isn’t allowed (rental, HOA restrictions, historical property)

Performance expectations (realistic view)
This is the part people get wrong: a bridge switch is not “free Ethernet.”
- You can often get excellent throughput if you have clear line-of-sight, clean spectrum, and proper alignment.
- If you’re trying to punch through multiple walls, trees, or you’re in a noisy RF environment, performance drops quickly.
- Latency is usually fine for cameras, phones, and general business apps, but it won’t be as consistent as a cable.
Rule of thumb: great bridges feel like “pretty good Ethernet,” not “perfect Ethernet.”
Strengths
- Fast deployment: avoids trenching and construction
- Clean topology: wired endpoints at the far side (cameras/APs/phones)
- UniFi management: visible in the controller; easy monitoring, updates, adoption
- Good for edge builds: ideal for a small cluster of devices in one remote spot
- Often more stable than weak Wi-Fi: especially for fixed installs
Weaknesses
- Still RF-dependent: interference, obstructions, and poor placement can ruin it
- Line-of-sight matters: foliage and buildings are the silent killers
- Not a bandwidth miracle: heavy multi-camera uploads can saturate the link
- Adds complexity: bridging gear + switch + proper mounting and alignment
- Single point of failure: if the bridge link drops, everything behind it drops
Use case scenarios
1) Detached garage / workshop network
You want a couple wired cameras and maybe an AP in the garage. Trenching is expensive. The bridge switch lets you mount the bridge gear, run Ethernet to cameras/AP inside, and manage it all centrally.
Why it fits: stable uplink + wired cameras/APs
Watch for: line-of-sight between buildings and metal siding issues
2) Parking lot or gate cameras
Cameras at a gate or on a pole need power and data, but running cable is a project. Put the bridge switch in a weatherproof box, uplink wirelessly, feed cameras via Ethernet.
Why it fits: cameras are fixed, predictable traffic, easy to monitor
Watch for: bandwidth planning if you add many high-bitrate cams
3) Temporary event / pop-up network
You need a remote POS station, a printer, or an AP in a tent. The bridge switch gives you quick wired connectivity without a spool of cable across walkways.
Why it fits: fast setup/tear-down
Watch for: spectrum congestion at crowded events
4) Extending network to an outbuilding on a farm
Barn office, livestock cams, or IoT gateways. Bridge switch provides the remote wired “island.”
Why it fits: long distances where pulling cable is costly
Watch for: trees/foliage changes across seasons
5) “I can’t drill / I’m renting”
If you can’t route cable through walls, a bridge is a practical compromise: keep the devices wired locally and only make the uplink wireless.
Why it fits: avoids invasive cabling
Watch for: indoor obstructions if you can’t get a clean path
Bottom line
If you judge it as a replacement for Ethernet, you’ll nitpick it. If you judge it as a way to create a remote wired cluster without construction, it’s a strong tool. The UniFi Device Bridge Switch shines when you need wired reliability for edge devices but can tolerate a wireless uplink that’s “very good” rather than “perfect.”
Who should buy it: people deploying cameras, APs, or small remote LAN islands where cabling is impractical.
Who shouldn’t: anyone who can easily run fiber/copper, or anyone expecting rock-solid gigabit behavior through walls and trees.
My use scenario
I have a couple uses for this device switch bridge but figuring out where to put it is somewhat challenging. Ideally, I would like to replace the rest of my Google cameras with UniFi equipment, and this switch would allow me to not have to run many cables, just may need to put the switch inside a wall or something, but not sure about how the heat will impact it. Another use would be for in my bedroom, where it IS possible to run ethernet, but would probably be noticeable (not wife approved). So, I could simply throw this switch in the bedroom in the basement and connect a TV and my wife’s school laptop to it). I can also use it to hardline the behemoth of a TV that I have in the living room, but the speeds are already pretty good in that area. I also plan on moving my office from the basement to the top floor one of these days, so it may be used there as well.
For now, I think I will at least test it in the basement bedroom to give my wife’s schoolwork and nearby TV some much needed speed increases. Tonight, I will give this a go and update this post in the morning with my findings.
Further Testing
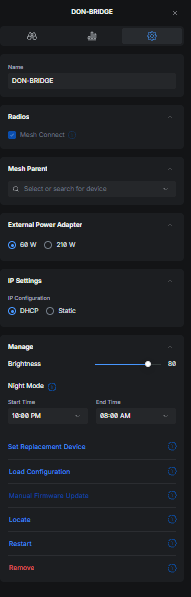
This morning, I went ahead and installed the device bridge switch in my basement bedroom, connecting both the TV and wife’s school laptop. This time, keeping the adoption when powering off and on wasn’t so problematic, but did take a bit to find the Wi-Fi again. I did some speed tests and found with Wi-Fi 7, while using the switch, I gained about 3-400Mbps download speeds, and more importantly, the connection was steady. I noticed this device also has a 10G port, so I will need to play around with that as well later. I interrupted my son’s Netflix wakeup for this install, but it was worth it!
I must say, having a screen on the device looks pretty nice, as most of the UniFi equipment I have doesn’t have one, but I couldn’t imagine actually using the screen for anything. The Poe+ output seems like it has tons of headroom, and may have me adding more cameras to the house using these switches (no running more cables).
Overall, I really think this device can be useful for many scenarios where running ethernet just doesn’t make sense. Begin able to use Wi-Fi 7 on devices that do not feature it is amazing, and the fact that it handles PoE+ will allow for a wide variety of camera installs. I think I will need 1 more of these bridge switches for the daughter’s room on the top floor, unless I end up running ethernet through the attic up there.
Categories: Reviews


