


Introduction
Modern smart homes often grow into a patchwork of devices; and in my case, all of the UniFi cameras, Alexa speakers, Nest devices, etc. each living in its own app, has become too troublesome to manage. What if you could view and control everything from a single screen mounted on your wall?
Enter Home Assistant, an open-source smart home hub that gives you full local control, deep integration with nearly any device, and a customizable dashboard you can display on a tablet, monitor, or dedicated PC.
In this guide, we’ll show how to transform your old PC into a powerful Home Assistant hub and kiosk display, unifying UniFi, Alexa, and Nest under one beautiful interface.
What is Home Assistant?
Home Assistant (HA) is an open-source smart home platform designed for privacy, flexibility, and automation. Unlike cloud-only systems, it runs locally on your own hardware — meaning:
- Faster response times
- Full control over your data
- Offline functionality
- Endless customization
With Home Assistant, you can:
- Unify multiple smart home brands (UniFi, Nest, Alexa, Hue, Sonos, etc.)
- Automate anything — for example, “If motion is detected on UniFi camera, turn on front porch light and announce on Alexa.”
- Visualize your home via a beautiful dashboard accessible from any browser or touchscreen.
- Integrate voice assistants, security systems, thermostats, and network gear in one interface.

Step 1: Install Home Assistant OS
You have two options:
Option A — Dedicated Home Assistant OS
If you want your PC to only run Home Assistant:
- Download Home Assistant OS for x86-64 from home-assistant.io/installation.
- Use balenaEtcher or Rufus to flash the image onto a USB stick.
- Boot the PC from the USB and install HA onto the internal drive.
- Once installed, open a browser on another device and go to:
http://homeassistant.local:8123 - Follow the onboarding steps (create account, name your home, set location).
Option B — Home Assistant Supervised / Docker
If you want to keep Windows or Linux for other uses:
- Install Docker Desktop (or use Linux + Docker).
- Run the official Home Assistant container:
docker run -d --name homeassistant --privileged \ --restart=unless-stopped \ -e TZ=America/Denver \ -v /home/user/homeassistant:/config \ --network=host \ ghcr.io/home-assistant/home-assistant:stable
Step 2: Configure Network and Access
Your PC gets a static IP address.
- You can access the HA dashboard at
http://<your-ip>:8123. - (Optional) Enable remote access using Nabu Casa if you want secure cloud access and Alexa/Google integration.
Step 3: Add Key Integrations
UniFi Protect Integration
- Go to Settings → Devices & Services → Add Integration
- Search “UniFi Protect”
- Enter:
- Your UniFi OS host (e.g.,
https://192.168.1.1) - Local username and password (won’t work with Cloud users).
- Your UniFi OS host (e.g.,
- You’ll now see each camera and motion sensor appear as an entity.
You can display live feeds and motion clips right in the dashboard.
UniFi Network Integration
Adds client tracking, uptime, and presence detection.
Steps:
- Add integration “UniFi Network”.
- Use your UniFi Controller credentials.
- You can now automate based on who is home (device presence), Wi-Fi status, etc.
Nest Integration
- Follow the official Nest integration guide.
- You’ll need to:
- Create a Google Cloud Project
- Enable Smart Device Management API
- Generate credentials (client ID, secret)
- Add the credentials in Home Assistant and authenticate your Google account.
- Cameras, thermostats, and sensors will appear in HA.
Alexa Integration
You have two main routes:
- Nabu Casa Cloud (recommended): enables Alexa/Google voice control and remote access in seconds.
- Alexa Media Player (custom integration): free, allows text-to-speech, notifications, and status control.
To install Alexa Media Player:
- Go to HACS → Integrations → Explore & Download Repositories
- Search for Alexa Media Player
- Add it and authenticate with your Amazon credentials.
Step 4: Build Your Dashboard
Go to Settings → Dashboards → Overview → Edit.
Add cards such as:
- Picture Glance (camera feeds)
- Thermostat (Nest)
- Network Status (UniFi)
- Media Control (Alexa devices)
- Lights / Switches
- Weather / Alerts
You can organize these by room or function — for example:
| Room | Cards |
|---|---|
| Entry | UniFi door camera, lock control |
| Living Room | Alexa control, lights, thermostat |
| Office | Network status, temperature sensor |
Step 5: Run in Kiosk Mode
Option A: Home Assistant Frontend (browser)
- Boot into Windows or Linux.
- Auto-launch Chrome or Edge in full-screen kiosk mode:
chrome.exe --kiosk http://homeassistant.local:8123 - Disable sleep mode, set startup scripts to reopen the browser on boot.
Option B: Kiosk-only OS
- Use Home Assistant OS or a lightweight Linux distro (Ubuntu Server + browser autostart).
- Install Kiosk Browser or configure X11/Chromium to boot directly to the dashboard.
Optional Enhancements
- Install Fully Kiosk Browser (if using Android tablets)
- Add a motion sensor or camera trigger to wake the screen
- Use themes or Lovelace cards to create a sleek wall-mounted look
Step 6: Automate Everything
Examples:
- If UniFi detects a person, show a camera popup on the dashboard.
- When Alexa alarm goes off, adjust Nest thermostat and lights.
- If a Nest camera sees motion after dark, announce “Motion at front door” on Alexa.
Final Thoughts
By repurposing and older PC, you’ve avoided purchasing a new device and created a powerful, local, privacy-respecting smart home hub.
With Home Assistant, you’re free from cloud limitations — your entire ecosystem (UniFi, Alexa, Nest, and more) lives harmoniously under one interface.
Whether wall-mounted or on a desk, your display becomes the “command center” of your connected home — and best of all, it’s entirely your own.
My Project
For running Home Assistant, I will utilize an older SFF PC that I will upgrade to 12GB of RAM; it has a i5 processor and a small SSD, which will be more than enough for this project.
I opted to load an Ubuntu OS to load Home Assistant, which was done by downloading the ISO Ubuntu file, then loading that onto a USB. Next, I booted up Ubuntu, downloaded the Home Assistant file, and installed it to the main drive. Next, I shut down Ubuntu, removed the USB, then loaded up Home Assistant. I had some issues with getting internet connection, but after learning the commands they use, such as ha network update wlan0 –ipv4-method auto –wifi-ssid “YourNetworkName” –wifi-psk “YourPassword,” it wasn’t too bad of a task. This command, when replacing the WLAN0 with the correct interface, as well as the actual network name and password, connects that interface to the selected Wi-Fi network. During testing, I had to keep doing this on each restart, but I believe once it is on my home network, this won’t be an issue as it won’t change.
I then had some trouble communicating with the Home Assistant device while using different devices and ended up only getting it working by entering the device IP address, followed by :8123. Once I got in, I started to load up some integrations, such as UniFi Protect, Alexa, and Nest, but realized this would probably be better to do at home on the network it will operate on going forward. So, once I get Home Assistant running optimally, I shut it down and turned my attention to the device itself, upgrading the RAM, cleaning dust, and labeled it.
Tonight, if I find time, I will install this device in my utility room rack with an ethernet connection and probably will run power to it from my UPS. I have a spare laptop at home (quite old, used it for my undergraduate degree), but it is a foldable device, turning into a touch-screen tablet, which when running in Kiosk mode with Home Assistant setup, will be perfect to keep in my living room running 24/7 to give users the ability to view and manage each of the various smart apps I use. It’s an old Asus laptop with an i7 and a GT840m GPU. I swapped the aging hard drive with an extra SSD I had lying around, as well as added an additional 8GB of RAM.
I can’t wait to get everything connected. Since I am using so many apps at the moment to manage everything, I am looking forward to doing this on a single program, as well as enjoy all of the other features it has. Wish me luck!
The Install

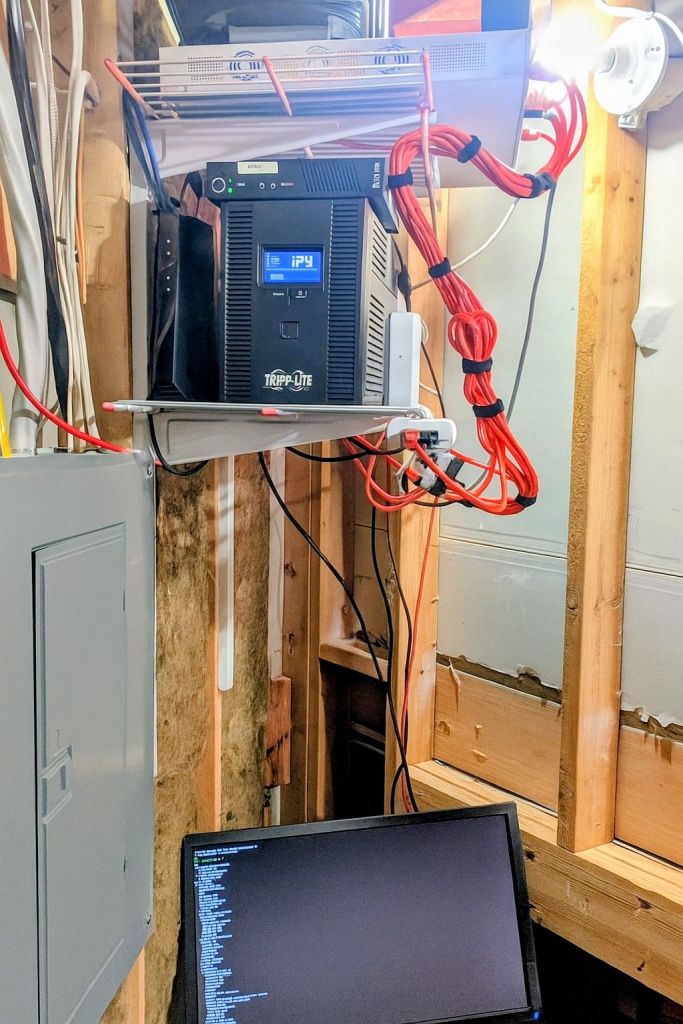
Well, that was an interesting project that will probably lead to an addiction! I got the Home Assistant server installed in my utility room ‘rack’ hardwired and battery-protected via my UPS; this was much easier at home, needing only CLI commands to enable wired internet, and disable Wi-Fi. I installed an older monitor I had lying around in the rack as well, currently connected to the Home Assistant server and in the future, to the UPS for management and visibility.
Note: Editing sleep and power restoration settings in the OS and BIOS should be done so the server comes back online after an outage.
I got the old laptop running the Home Assistant website pretty easily and opted to set it up in tablet mode (touchscreen), kiosk mode, and edited power and sleep settings accordingly to allow to stay running. This is where things got interesting.

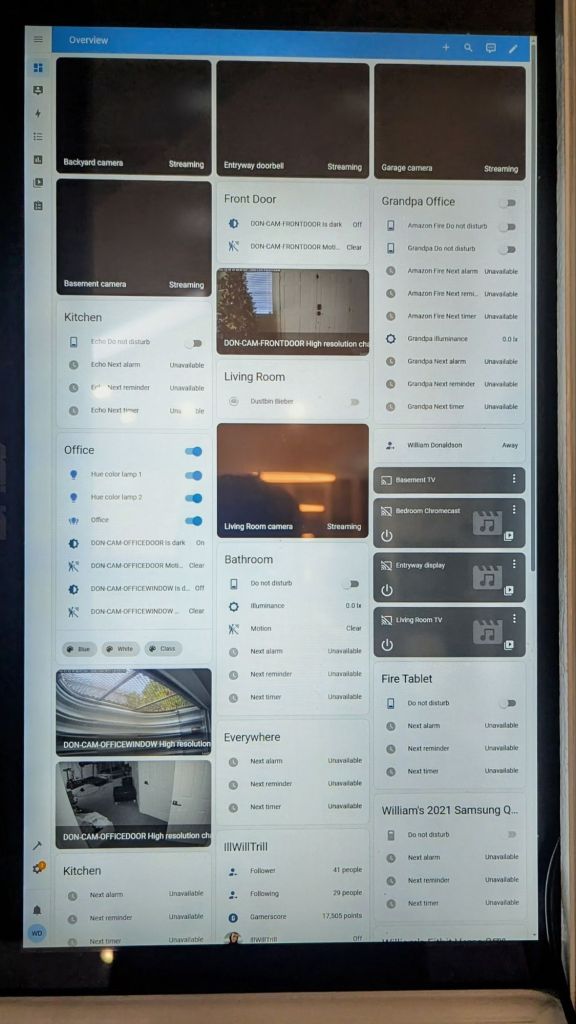
Upon first boot of the Home Assistant website, it began to pull various devices automatically, but when I started to install other integrations (UniFi Protect, Google Nest, Amazon, etc.), I realized this was a bit more complicated than I had originally thought. Most of them were pretty easy, but the Google Nest integration was such a pain. To quickly summarize it, you need to install the Google SPK module, make a Google Cloud project, pay the $5 fee, start a project and subscription, enable access settings for users (Owner, viewer, sub/pub access), and a ton of other little things not mentioned anywhere online. After much trial and error, I finally got it working, as well as integrations such as UniFi Protect, Amazon Alexa, Shark (robot vacuum), HUE lights, Xbox, and a few others. I also set up remote access using Nabu Casa so I can get into the system from afar, but I believe I will cancel it once the trial is over depending on the price.
Home Assistant is just amazing. Being able to see all of the devices in my house in one platform is so helpful, and the system allows for greater visibility of everything as it shows all events and updates, such as lights that are on, visitors coming and going, and much more. There are so many things I still want to do, such as set up a weather integration, automations, and push more integrations, but I think I can call this project completed. Onto the next!
Categories: Operating Systems/Programming


