


A setting I recently encountered in UniFi while setting up a retired UniFi USG Pro firewall at home caught my eye, and I figured I would try it out. UniFi’s internal honeypot setting looks to be something I can learn from, so I wanted to see what other steps would be required to get one up and running. Please note that the below guides are what I have found through research and haven’t been tested yet (I will try to get some free time this weekend), so the steps and information I provided might change drastically.
In the world of cybersecurity, proactive defense mechanisms are essential for staying ahead of potential threats. One such mechanism is the honeypot. This blog post will delve into what a honeypot is, how it can be effectively used within a UniFi network, and provide a comprehensive, step-by-step guide to setting up and analyzing an internal honeypot using a UniFi Cloud Key+ Gen 2 and a UniFi UXG Lite firewall.
What is a Honeypot?
A honeypot is a decoy system designed to attract and capture malicious activity within a network; it functions as an intentionally vulnerable system or service that appears legitimate to attackers. The primary goal of a honeypot is to lure attackers, observe their behavior, and gather intelligence about their tactics, techniques, and procedures (TTPs). By doing so, organizations can enhance their understanding of emerging threats and improve their defensive strategies.
Types of Honeypots
- Low-Interaction Honeypots: These simulate basic services and vulnerabilities with limited interaction capabilities. They are less resource-intensive and simpler to deploy but provide less detailed insights.
- High-Interaction Honeypots: These mimic real systems and services with a higher degree of interaction, allowing attackers to engage more deeply. They offer richer data but require more resources and management.
- Hybrid Honeypots: Combining elements of both low and high-interaction honeypots, hybrid models provide a balance between simplicity and depth of data.
Benefits of Using a Honeypot
- Threat Detection: Honeypots help identify and alert security teams to potential threats that may not be detected by traditional security measures.
- Behavior Analysis: Observing how attackers interact with a honeypot provides insights into their methods and intentions, aiding in better defense planning.
- Network Intelligence: Honeypots can help uncover other potential vulnerabilities within the network by revealing the attacker’s approach and strategy.
- Deception Tactics: By diverting attackers away from critical systems, honeypots act as a diversion, reducing the risk to actual sensitive assets.
Deploying a Honeypot Using UniFi’s Interface: A Comprehensive Guide
In this blog post, we’ll explore how to set up a honeypot within a UniFi network environment using only UniFi’s interface. Specifically, we will focus on configuring a honeypot with the UniFi Gateway (UXG Lite) and the UniFi Cloud Key+ Gen 2, without needing external honeypot software. This approach leverages UniFi’s built-in capabilities to create a honeypot-like environment for detecting and analyzing suspicious activities.
Understanding the UniFi Honeypot Concept
UniFi’s internal honeypot’s operations are widely unknown to me, and I see little information about it, besides the following (taken from UniFi’s website).
UniFi Gateway – Honeypot
Honeypot is a feature found in the Firewall & Security section of your Network application that listens on a specific IP address and helps discover malicious clients on the network.
Requirements
A Next-Gen UniFi gateway or UniFi Cloud Gateway.
Available Options
Honeypot can be enabled on specific networks and will notify you when requests are made to its IP address. If there is a malicious client on the network, it will look for vulnerabilities by scanning open ports on the rest of the devices in the network. When it scans the Honeypot IP, a Security Detection will be shown in the System Log section.
I Got a Honeypot Security Detection. What Should I Do?
Determine which client was responsible for connecting to the Honeypot IP address. If this is a trusted client and the behavior is not intentional, then there may be a (malicious) program installed that is scanning the network.
Frequently Asked Questions
- I have Honeypot enabled but I do not see any notifications.
Under normal circumstances, there will be no notifications shown in the System Log section. A notification will only be shown when a (malicious) client tries to connect to the Honeypot IP address. - How can I test the Honeypot feature?
Testing can be done by using the following command:
curl x.x.x.x:21
Replace x.x.x.x with the honeypot IP.
Benefits of Using UniFi for Honeypot Implementation
- Simplified Setup: Use UniFi’s intuitive interface for network configuration without needing additional software.
- Integrated Management: Manage and monitor the honeypot from the same platform as your other network devices.
- Network Segmentation: Leverage UniFi’s VLAN and firewall capabilities to create a controlled and isolated honeypot environment.
Step-by-Step Guide to Setting Up a Honeypot Using UniFi’s Interface
1. Prepare Your UniFi Environment
- Ensure Firmware and Software Updates:
- Verify that your UniFi Cloud Key+ Gen 2 and UXG Lite firewall are updated with the latest firmware and software versions. This ensures compatibility and access to the latest features.
- Access the UniFi Controller:
- Log in to your UniFi Controller through the Cloud Key+ Gen 2 web interface.
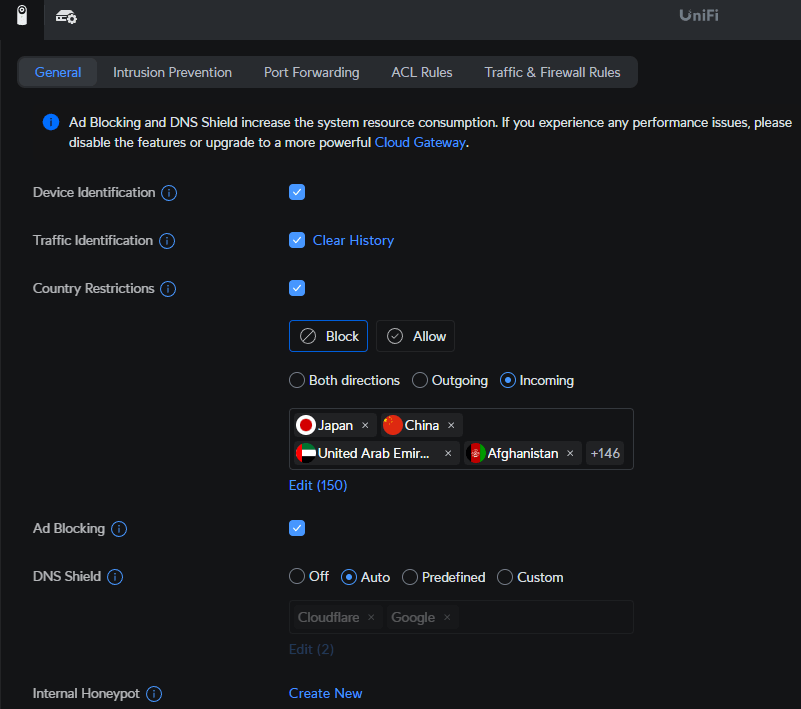
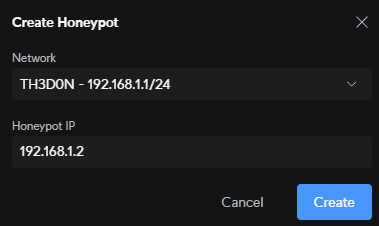
- Create UniFi Internal Honeypot:
- Navigate to Protect > Security > General > Internal Honeypot > Create New > Pick Network > Assign Honeypot IP (used in later steps)
2. Create a VLAN for the Honeypot
- Navigate to Network Settings:
- In the UniFi Controller interface, go to
Settings > Networks.
- In the UniFi Controller interface, go to
- Add a New Network:
- Click
Create New Network. - Set the Name to something indicative like “Honeypot VLAN”.
- Set the Purpose to
Corporate(or choose another suitable option if available).
- Click
- Configure VLAN Settings:
- Enable the VLAN option and assign a VLAN ID (e.g.,
100). - Set the Gateway IP/Subnet (e.g.,
192.168.100.1/24). - Configure the DHCP Mode if needed or set up a static IP range for devices in this VLAN.
- Enable the VLAN option and assign a VLAN ID (e.g.,
- Save the Configuration:
- Click
Saveto apply the changes. This creates a separate network segment for your honeypot.
- Click

3. Configure the Honeypot Environment
- Prepare a Device for the Honeypot:
- Connect a device (physical or virtual) to the newly created VLAN. This could be a dedicated machine or VM running vulnerable services or applications.
- Set Up Basic Vulnerabilities:
- Install and configure services that are known to be vulnerable, such as old versions of web servers or FTP servers, or use default configurations that could be exploited. Ensure these services are running on the IP range allocated by the VLAN.
4. Set Up Firewall Rules
- Navigate to Firewall Settings:
- In the UniFi Controller, go to
Settings > Security > Firewall & Traffic Rules.
- In the UniFi Controller, go to
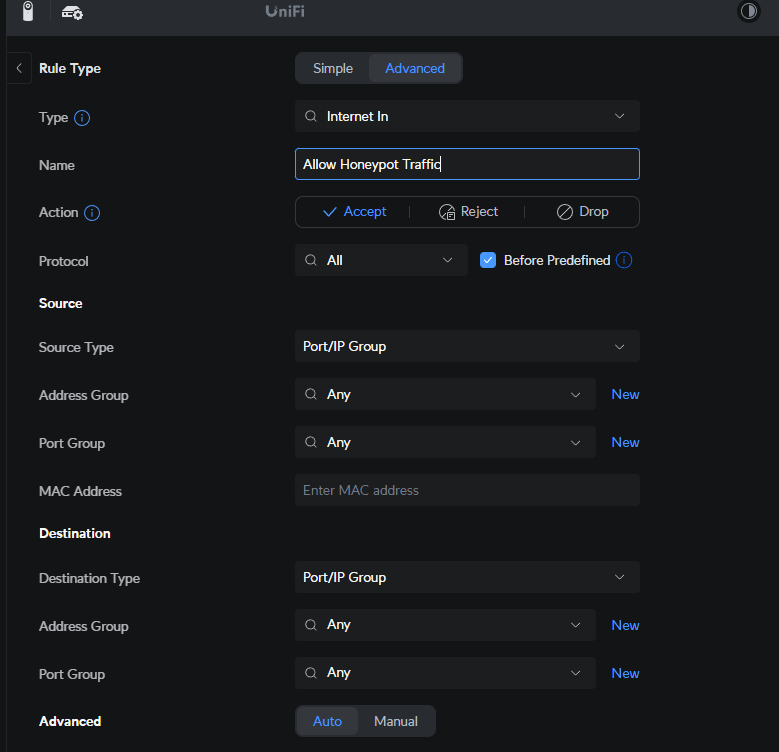
- Create a New Firewall Rule:
- Click
Create New Rule. - Name the rule something like “Allow Honeypot Traffic”.
- Click
- Configure Rule Settings:
- Rule Applied: Choose
LAN INif you want to monitor traffic coming into the honeypot. - Action: Set to
Acceptto allow traffic to the honeypot. - Source: Set to
Anyif you want to capture all incoming traffic. - Destination: Set to the IP range of your honeypot VLAN (e.g.,
192.168.100.0/24).
- Rule Applied: Choose
- Save and Apply the Rule:
- Click
Saveto apply the rule. This ensures that traffic destined for the honeypot VLAN is not blocked.
- Click
5. Monitor and Analyze Honeypot Traffic
- Enable Logging:
- To capture and analyze traffic, you need to enable logging for the firewall rules.
- Go to
Settings > Security > Firewall & Traffic Rules. - Edit the rule you created and enable the
Logoption. This will log all traffic that matches the rule.

2. Review Logs:
- Navigate to
Insights > Logsin the UniFi Controller to view the firewall logs. - Filter the logs by the VLAN or IP range of the honeypot to analyze the captured traffic.
3. Use Network Insights:
- Utilize the
TrafficandClientssections in the UniFi Controller to monitor the honeypot’s network activity. - Look for unusual or suspicious behavior, such as unexpected traffic patterns or attempts to exploit vulnerabilities.
6. Maintain and Update the Honeypot
- Regular Monitoring:
- Continuously monitor the honeypot traffic and logs for signs of malicious activity.
- Adjust firewall rules or honeypot configurations as needed based on observed behavior.
- Update Vulnerabilities:
- Periodically update the services running on your honeypot to reflect current threat trends or to test new attack vectors.
- Review and Adapt:
- Regularly review the effectiveness of your honeypot setup and make adjustments based on your findings and evolving security needs.
Conclusion
Setting up a honeypot using UniFi’s interface provides a streamlined approach to network security without the need for external honeypot software. By leveraging UniFi’s VLAN and firewall capabilities, you can create a controlled and isolated environment to attract, monitor, and analyze suspicious activities. This proactive approach enhances your ability to detect and respond to potential threats, contributing to a more robust overall security posture. Regular monitoring and adaptation will help ensure that your honeypot remains an effective tool in your cybersecurity arsenal.
Step-by-Step Guide to Setting Up a Honeypot (Using Third-Party Software)
Prerequisites (in my case)
- UniFi Cloud Key+ Gen 2: This device provides centralized management for UniFi networks and helps streamline configuration.
- UniFi UXG Lite Firewall: Acts as a network security gateway, providing advanced protection and control over network traffic.
- Honeypot Software: For this guide, we’ll use the Honeyd honeypot software, which is well-suited for creating virtual honeypots.
- A server or VM to run the honeypot software. This could be a dedicated physical server or a virtual machine (VM).
1. Prepare Your Environment
- Ensure Compatibility:
- Verify that your UniFi Cloud Key+ Gen 2 and UXG Lite firewall are updated with the latest firmware and software versions.
- Set Up the Server/VM:
- Install the operating system of your choice on the server or VM that will run the honeypot. Linux is a common choice due to its flexibility and support for honeypot software.
2. Install and Configure Honeypot Software (HoneyD, in this example)
- Install Honeyd:
- Access your server/VM via SSH or a terminal.
- Update your package list and install Honeyd using the following commands:bashCopy code
sudo apt-get update sudo apt-get install honeyd
- Configure Honeyd:
- Create a basic configuration file for Honeyd. This file will define the virtual honeypots and their characteristics.
- Example configuration (
/etc/honeyd/honeyd.conf):plaintextCopy codecreate default set default personality "Windows XP" add default tcp port 80 open add default tcp port 22 open bind 192.168.1.100 default
- Start Honeyd:
- Launch Honeyd with your configuration file:bashCopy code
sudo honeyd -d -f /etc/honeyd/honeyd.conf
- Launch Honeyd with your configuration file:bashCopy code
3. Configure UniFi Network Settings
- Log in to UniFi Controller:
- Access your UniFi Controller via the Cloud Key+ Gen 2 web interface.
- Create a New VLAN:
- Navigate to
Settings > Networks. - Create a new VLAN for the honeypot to segregate it from your production network. Assign it an appropriate VLAN ID and subnet.
- Navigate to
- Configure Firewall Rules:
- Go to
Settings > Security > Firewall & Traffic Rules. - Add rules to direct traffic destined for the honeypot’s IP address to the new VLAN. Ensure rules are in place to capture and log traffic to the honeypot.
- Go to
- Update Routing Settings:
- Ensure that the UXG Lite firewall routes traffic appropriately between the VLANs and the external network.
4. Monitor and Analyze Honeypot Data
- Access Honeypot Logs:
- Monitor the Honeyd logs to review interaction data. Logs are typically stored in
/var/log/honeyd/.
- Monitor the Honeyd logs to review interaction data. Logs are typically stored in
- Analyze Traffic:
- Use network analysis tools like Wireshark or tcpdump to analyze the traffic captured by the honeypot. Look for suspicious activity or patterns that indicate potential threats.
- Review Honeypot Alerts:
- Regularly check for alerts or unusual behavior reported by Honeyd. Investigate any suspicious activities to understand potential vulnerabilities and threat vectors.
- Integrate with SIEM:
- Consider integrating the honeypot logs with a Security Information and Event Management (SIEM) system for advanced analysis and correlation with other network security data.
5. Maintain and Update Honeypot Configuration
- Regular Updates:
- Keep your honeypot software and configurations updated to reflect changes in attack methods and network architecture.
- Adjust Settings:
- Based on the data collected, fine-tune your honeypot settings to better mimic real systems or to focus on specific types of attacks.
- Review and Adapt:
- Periodically review the effectiveness of your honeypot strategy and adapt based on evolving security threats and organizational needs.
Conclusion
Deploying an internal honeypot within a UniFi network can provide valuable insights into potential threats and enhance your overall security posture. By carefully setting up and monitoring a honeypot using tools like Honeyd and integrating it with your UniFi Cloud Key+ Gen 2 and UXG Lite firewall, you can gain deeper visibility into attacker behavior and better protect your network infrastructure. Stay proactive and adaptive in your cybersecurity strategies to maintain a robust defense against evolving threats.
I personally am looking forward to testing this UniFi honeypot out, and connecting one of my older PCs to it to see what kind of traffic/scans it gets; this will give me a look into cybercriminals’ operations, which will allow me to secure the rest of my networks. Hopefully, this weekend goes well, and I will be able to update this post with a successful entry. Wish me luck!
Categories: Security


