


The Project
For my 2017 BMW 750i, I have been researching higher-performing air intakes since I have had the vehicle, and the available options are either too pricey or are known to cause issues (ARM intakes, for example, need the MAF housing trimmed down a bit to avoid a CEL). So, I figured there would be a cheaper way to simply collect colder air from the front of the vehicle, while still retaining most of the factory equipment. Enter my brain.
Currently, I have done the following performance modifications done to the car:
- RaceChip S Tuner (Piggyback, +3 PSI)
- Custom MagnaFlow dual exhaust (deleted both resonators, added 2 MagnaFlow straight-through mufflers, and an x-pipe)
- K&N drop-in air filters (no charcoal filters)
- E-30 fuel blend
Let me start by saying I have yet to begin this project but am making this post for my use as well when the time comes.
The Build
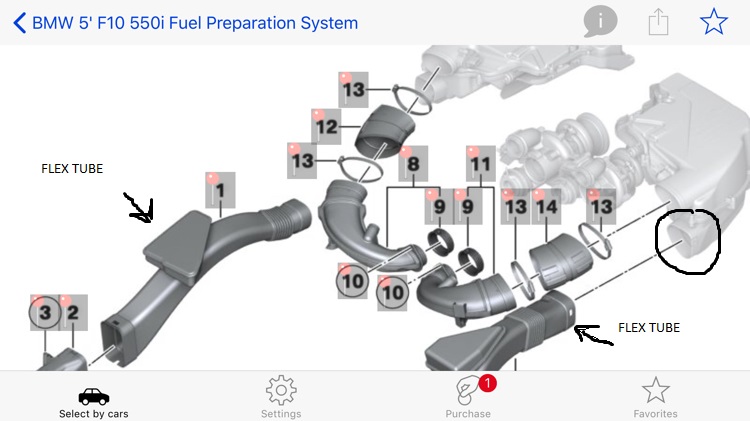
So, to explain what this project will do, let me provide a general overview. Below, you will see the layout of the factory air intake system. As you can see, the stock air intake system has its filters directly above both turbos, and the air tubes feeding the air boxes route cold air from around the grille; while this setup does provide colder air than say, slapping an uncovered cone filter in a hot engine bay, it still leaves room for improvement. For this mod, I will be removing the air filters from the factory air boxes, and then, adding small cone air filters to the front of the grille, attached by flex tube (which is replacing the factory air inlet pipes). With this setup, the air coming to the air filters will be cold and dense, and the travel to the air box should be smoother, in theory!
A step above this system would be to remove the factory air boxes entirely and install a new air intake housing (that holds the MAF sensors, one from a Chevy Cruze fits (with some modification I think)) along with a U-bend pipe, routing to the front of the grille (this is what the ARM air intake does). Another (better) option, would be to use X5M (I believe) air inlets which eliminate the U-bend pipe entirely, providing a much straighter airflow path to the front of the car.
I may opt to try these two methods at some point, but for now, for the sake of my warranty, I think I will opt to just invest around $50 for this mod, as intakes do not generally give you a lot of power, but they sure sound amazing!
Supplies Needed:
- 2 cone air filters (available at AutoZone for $15-$20 each)
- 2 flexible intake tubes (available for $20 each)
- Caulk or high-heat sealer
- Clamps
Step 1: Remove the Stock Intake System
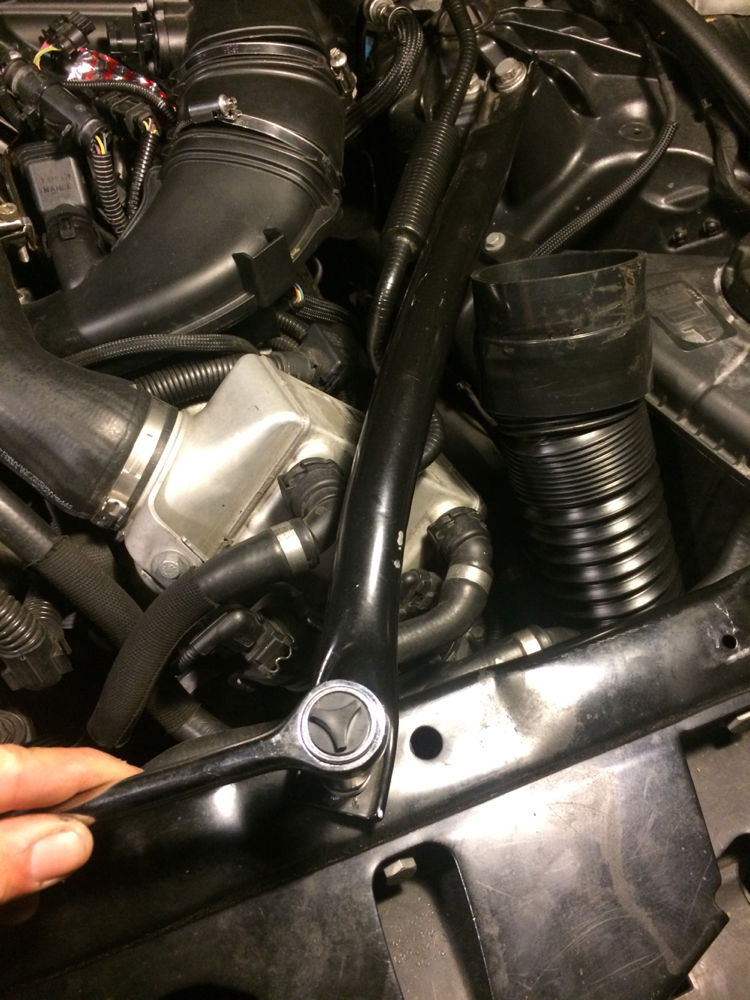
To begin, you’ll need to remove the stock intake system. Start by removing the crossbars located above the intake tubes. Use a 5/8″ or 15mm socket to remove the bolts securing these bars.
Next, disconnect the intake tubes, which are secured by push/slip-on connections. Use a body tool or flathead screwdriver to create a slight gap, which will allow you to detach the connections. There are three connections to remove:
- At the front near the radiator and kidney grilles
- At the intake air box/silencer
- At the curved intake that mounts into the turbo
Carefully remove the entire assembly up to the connection before the intake into the turbo. Small clamps securing these components can be removed with a flathead screwdriver, 1/4″ socket, or 6mm socket. Be cautious when removing and reinstalling; the intake tube into the turbo can be flexed, risking damage to its small mounting plastics, which could compromise the connection to the turbo.
Step 2: Modify the Airbox
Remove the airbox by first unplugging the mass airflow (MAF) sensor. Then, take out all the Torx screws (likely T20) and remove the air filter. Leave the MAF sensor in place. Reconnect the airbox components and secure them with the Torx screws. You’ll notice a slight gap where the airbox and silencer were previously located; this gap must be sealed with caulk or high-heat sealer to prevent MAF error codes. An improperly sealed intake system can trigger a “Too Much Volume” MAF code.
Once sealed, install the flexible tubing onto the connections at the airbox.

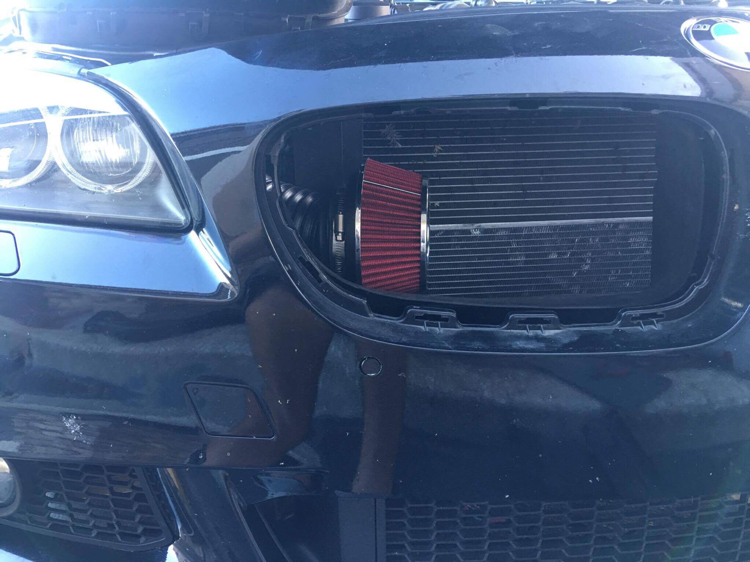
Step 3: Install the Cone Filters
To fit the cone filters, you may need to remove the kidney grille. Only one side needs to be removed to allow sufficient space for installation. Attach the flexible tubing to the cone filters and secure the connections with clamps. Ensure clamps are applied around the cone, the flex tube, and at the connection points between the airbox and the stock intake tube leading to the turbo.


As my car has active grille shutters (close and open the grille to allow airflow based on temperature), I may want to disable these to allow air to flow through the grille at all times, instead of when it is hot. Honestly, when you select sport mode in this car, or after the engine gets warm enough, the grille seems to stay open quite often, and in winter, the active grille shutters are beneficial as they help the car heat up quicker during cold starts by keeping the grille’s shutters closed. Due to all of this, I may hold out on removing the grille shutters for a bit, but I went ahead and added the instructions for this task as well below.
Disabling Active Grille Shutters
Step 4: Adjust the Shutters
- Open the Shutters: Start the car and drive around to keep the shutters open for about 2 minutes. You may need to switch between driving modes (Sport/Sport+) to keep them open.
- Detach the Shutter Arms: Locate the plastic push pins connecting the motor to the shutters. Use needle-nose pliers to squeeze and remove these pins. Be cautious, as they may pop out unexpectedly.
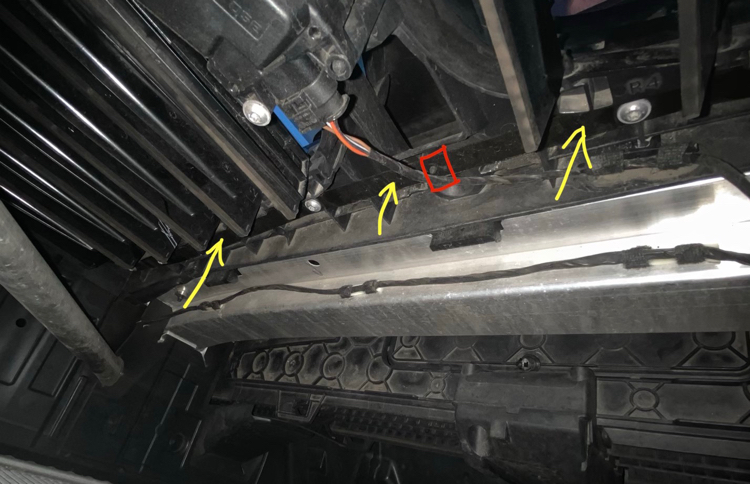
- Remove the Metal Retaining Bar: Behind the shutters, you’ll find a metal retaining bar secured by screws. These screws can be difficult to access due to their angle and tight space. Carefully remove them.
- Remove the Shutter Assembly: Once the screws are removed, lift and shimmy the shutter assembly out. It is easier to do this one side at a time. Do not fully remove the bar, as it is held by a plastic nib under the motor. Moving the bar back slightly should provide enough room to extract the assembly.
- Reattach Components: Replace the screws for the metal retaining bar and reinsert the plastic pins to avoid losing parts if you decide to revert to the stock setup.
- Enjoy the Open Grille: After reinstalling the components, you should see the open grille look without any Check Engine Lights (CELs).


Final Adjustment:
To bypass the error code caused by the missing shutters, trick the system into thinking they are still present. Use zip ties to simulate the feedback force of the shutters. Attach the zip ties to the flap mechanism to mimic the open or closed positions. Make sure the zip ties are tight enough to simulate the closed position but not so tight that they cause issues. This solution is discreet and not visible once the grille is reinstalled.

If I do decide to disable the active grille shutters, I will also install a pair of blue strut brace covers to improve the look, as shown below; these should match the blue air filters I install quite well.
I might also get some intake filter socks because the filters are so out in the open; these will massively reduce the chance of water getting to the filter, plus act as a pre-filter.

Conclusion
This guide should help you successfully install a custom cold air intake on your 2017 BMW 750i, or many cars with the N63TU engine. With this mod, your IATs (Intake Air Temperature) should be reduced, allowing colder and denser air to hit the turbos, as well as maybe adding a few horsepower (for those running more boost than normal). You might also notice a slight increase in responsiveness, as well as some amazing turbo noises. Have fun and wish me luck!
Categories: Random Thoughts


